Sunday 21 February 2016

Purple presents

This blog is about the gifts I have been making for my daughter. I love making things for children and I always like to include something handmade with my little girls presents. In the past I have made her a quilt with mini blanket and a caterpillar and a cooker. The quilt and blanket are loved and the caterpillar gets an occasional hug. She is often very enthusiastic about the things I make but she seems to think they take a few minutes when she goes to bed. She will see me looking at a pattern book and a couple of days later it is there. She once told me that she thought other Mummies spent a lot of time buying presents whereas I "just" make them.

I made toys for other children in the lead up to Christmas, I was hoping that she would fall in love with something and I could just make her one of those.... The problem was that she didn't fall in love with any of the things I made. She gave them all a little hug and helped me wrap them. I like to think that this is because they were already for somebody else in her mind. The alternative is that no child will love them and I couldn't think like that! I was stuck for ideas and getting increasingly frustrated then I remembered the thing that she had been commenting on over and over again.

My daughter loves Charlie and Lola books by Lauren Child (spoiler warning) and one of them is all about looking after a dog. The dog gets lost and when they find it they find two identical dogs. In the end they are told you can identify the correct dog by the tag on his collar. One of my daughters favourite toys is a dog with no collar. Every time we read the book she mentions this (about 30 times) so I realised all I needed to do was make a collar for the dog.

I took the measurements and played about with the design in my head. I could make a tube out of fleece (yes I love fleece) and top-stitch it or I could use cotton fabric and interfacing to keep its shape? How to make the ends neat and what kind of fastening mechanism were also causing me problems. Her favourite colour is purple, I decided to use left over faux leather from covering our dining chairs. I was worried that it would be too thick to sew right sides together and turn but I was not sure about the white underside showing, I then realised I was over thinking the whole thing. I took two strips of the faux leather and sewed it together using a small white top stitch which tied in the white that was showing making it look intentional. I crimped the ends using crimping shears and I added poppers using my Kam popper tool. I cut two circles of felt and hand stitched "Kindle" (the dogs name...) on one circle. I blanket stitched the felt circles together and attached it to a stitch in the collar. It was simple but looked rather effective and I was quite pleased.

I felt a pang of guilt that other children had more complicated and elaborate toys made by me while my little girl had upholstery scraps. My husband was chuffed with it and assured me it would be fine. I got on with the rest of the Christmas preparation and I had just turned the craft room into the spare room when my daughter handed me a bit of paper. I asked what she had drawn and she said "a hippo I thought you could make it one day". I will be honest, I was tempted to get the machine out and sew through the night keeping our visitor awake but it did not seem very festive. On Christmas morning amongst the gifts sent from friends and relatives - she opened the little parcel and gave the biggest grin. She went to show Kindle and they played in the hall together. Admittedly she never actually told me she liked it but she did tell me Kindle loved it. It felt like such a risk at the time but children don't see the time taken or the cost of fabric they just see something they love or something that is forgettable. It was an important lesson in keeping it simple.


Toy dog collar

Unsurprisingly though for her birthday I made her a hippo. I made it using a pattern from Sew Cute to Cuddle by Mariska Vos-Bolman. I adore her designs and I used them for Mollie and the Wedding Tortoise. The diagrams and descriptions as always are really clear. One of the best things is that she shows the finished toy from all angles so you know what all of the parts have to look like.

I chose to make it using purple fleece, obviously! I have now made enough toys to see where I feel the pattern will be challenging. I knew that I would have to be careful with the darts in the body in order to get a good shape and I was a little concerned about inserting the feet as it looked tricky. The darts went in with no problem and the construction was fine. I found that the feet were as tricky as I imagined, sewing one half and then the other is a great tip, as otherwise I would have probably tried to do it as a continuous circle which would have made it more difficult to move the bulk of the fabric around the machine.

To make the hippo you construct the body and the head separately and then put them together, I was really nervous about putting the two together as I had visions of mismatched seams but it actually came together perfectly and I was pleased that the seams lined up. It says in the book that she is a rather large hippo and I would second that, it took a bag and a half of toy stuffing to fill her. I will admit it felt slightly odd to spend my Sunday evening with my hand stuck up a purple hippo's bum. I decided to use fleece eyes and add on small buttons for the pupils. As she gets older my daughter is increasingly fascinated by my button box and certainly has her favourites and she noticed them quite quickly and was excited about them. The hippo has proven to be very popular and is so big that half of the time my daughter uses it as a cushion. It is definitly more loved than the caterpillar I made for her first birthday.


Hippo - design by Mariska Vos- Bolman

Friday 19 February 2016

How I do "it"?

I am hoping that this post is not as egotistical as it sounds. I get asked the question "How do you find the time/ How do you do it?" a lot. It was the most frequent comment at the craft fair and it got me thinking. There are quite a few ways to take the question so I have tried to look at it from all approaches. I am busy, and I do feel busy, as I work full time and have a little girl so craft time gets arranged mostly in the evening as a time to relax.

The most important thing is "wanting" to do it and this is the key. I find the time because I enjoy it and I love seeing people appreciating things I have made. When I think about it I realise that I am actually doing no more than those people who ask me how I do it. I am just really lucky that I get to show off a pile of stock on a fun display, or photograph an "army" of turtle egg cosies. If, at craft fair time, everybody that I know had stalls of how they spend their spare time then I know I would be amazed at the mountains of books read, the miles ran, the music learned (and perfected), the baking done and the food made, as well as broods of Children raised and well loved pets. I never know how to respond to the  "How do you do it?" question because my answer is normally I just do it because it is fun . It is flattering to be asked but I never feel like "it" is anything special because everybody has an "it". I hope that most people are lucky enough to have found one they love as much as I love mine.

To answer the question in a more practical way when it comes to getting things done I find three things have been helpful:

First of all I do not do it alone, I have my Mum on speed-dial for advice, I have fantastic friends , the local makkin and yakkin group and my husband is incredibly understanding and supportive of the things I feel I "need" to do. It sounds cliché that we do things as a team but it is true.

Secondly sometimes I just don't get things done. My blog posts can be sporadic and I phone people sometimes to tell them gifts will be late or that cards will be bought. It has taken a long time and some effort to accept that this is okay. I am terrible at finishing projects for myself, I still have a quilt to finish, and I have a friend that threatened not to accept gifts until I made something for myself. Sometimes we just get ill or caught up in something else and cannot do the things that we planned to. I am slowly learning to not be too tough on myself which is easily the most difficult part.

The third part is planning, I write lists and have 'post it' notes everywhere. I break each project down into smaller tasks and tick them off as I go. If I write something down I no longer have to worry about it as I know it will be there when I go back. This helps me keep track of where I am. I also try and schedule in a catch up day where I can finish things. This is helpful if I have underestimated how long they will take or had to unpick seams. This is really important when I have Christmas presents or craft fair stock to make as I am producing quite a large volume.


Wednesday 17 February 2016

From dining chair to play cooker...


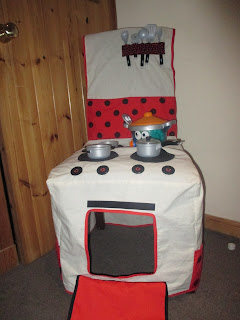
The idea for my daughters third birthday present came in the form of a Facebook share from a friend who had spotted a kitchen chair cover on "the artful parent" Facebook page. It was a link to a German product. I used the picture to design my own as I could not find a pattern and I wanted it to fit my chairs. We don't really have space for a full kitchen play-set but my daughter was playing with her pans more and more so it seemed like the perfect idea. I have outlined the way I went about making it, it is very dependent on the chairs you have so I have not provided measurements and the number and position of pockets is optional as is the opening of the oven and the way you finish it off. It is such an easy project to personalise and there is nothing too complicated in terms of sewing as long as you measure well take your time.

Step One : Measurements, cutting and fabric.

I measured the seat of my chair A-B, B-D, D-C, C-A, I measured from the seat to the top of the back rest A-E, E-F, F-B, B-A, from the top of the backrest to the floor E-F,F-H, H-G, G-E. I then added up the measurements from the front of the seat A-C+ C-D + D-B to get the width for the bottom of the chair below the seat and measured  B-J for the length.. I added 2cm onto all of the measurements for seam allowance. I cut all of the pieces out of calico. Calico is a really good fabric to use for this sort of thing as it is hard wearing and versatile and also not very expensive.

My little girl has always liked ladybirds so I decided to use ladybird fabric and ladybird print fabric to add on the contrasting details. I wanted it to be bright and fun and vibrant. I used some spare red fabric as well. Pocket one is measured A-B with double the height I needed it to be and pocket two was designed as a strip that goes part way across again double the height I wanted it. Pockets three and four are the length of A-C/B-D and twice the height I  wanted them to be when finished. I cut 4 circles out black fleece, fleece is fantastic as it is inexpensive and wont fray. To get the right size I used card circles of different sizes until the spacing looked correct. Tea plates/saucers would work instead of card.


Pattern plan for cooker chair cover, red is for the contrast fabric.

With all of my pieces cut out I set about putting it together.

Cooker chair cover
Step Two: Contrast pockets: 

I folded pocket one right sides together along the horizontal edge, I then stitched the two vertical sides together and turned the right way round. I top stitched the folded edge. I then pinned it to the base of the seat back (A-B). I decided to divide it into two pockets - I marked these out and stitched them in. I then stitched the edges on. I left the bottom with a raw edge. I then folded pocket two along the horizontal edge with the right sides together and sewed one long and one short edge to make a tube, I turned the tube and folded the raw edges in hand sewing the gap closed. I chose to divide the pockets into 6 so that her utensil handles would fit into them. I then made pockets three and four, again I folded on the horizontal with right sides together and stitched the short seams. I positioned them on the bottom of the chair section lined up with I on one side and J on the other. I decided to divide these into 3 pockets for general storage and play.


Step Three: Hobs and oven:

Cooker chair cover with open oven door.
I pinned the fleece hobs onto the seat piece making sure that I had left plenty of space around the edge to join the pieces together and for the buttons. The next step is to make the oven - my dining chars have legs and space under the chair so I made a oven door that opens so she could put things in the space below. If you have a solid chair this would be pointless and you could just stitch the door on without cutting a hole. I cut two "oven door" squares and attached a strip of Velcro to the right side of one piece. I then stitched the two pieces right sides together leaving a small turning gap. I turned it the right way round and ladder stitched the gap closed. I decided to make the door out of plain red fabric as I did not have enough ladybird although it looks intentional. I edged it with black bias binding to give it a good contrast. I then cut out a square 4 cm smaller than the "oven door". I trimmed the hole with red bias binding and attached the opposite strip of Velcro above the hole. I stuck the Velcro together and pinned the sides in place, I then stitched the base of the door on over the bias binding using a small strong zig zag.


Step Four: Construction:

 I started by pinning A - B on the seat to A - B on the seat back with right sides together. I then stitched this seam making sure the raw edges of the pockets were trapped between the pieces. I  pinned E-F and F-E  right sides together and stitched this seam. I then pinned the bottom of the chair onto the seat with right sides together matching A to A right round to B. This is the trickiest part I found and take time to get the curve correct. I then stitched along and the cooker was constructed. I put it on the chair at this point to make sure I was happy with the fit, seam adjustments or trimming the edges could still be done here.

Step Five: Edging:

In the original picture there appeared to just be an over-locked seam. I decided to use bias binding, I have loved using bias binding since the skipping skirts and I felt it gave the opportunity to add another level of co-ordination. I ironed the bias binding in half and pinned it to the edges and then top stitched it. The amount of bias binding is a lot and will depend on your chair. If you want to calculate it then it will be J-B + B-F + E-G + G-H + H-F + E-A + A-I + I-J or simply measure round it with a tape measure. I added 4 large black buttons with red thread for the cooker knobs. I placed these on the seat in front of the hobs but they could easily go on the front just above the oven. I then added two ties made out of cotton ribbon on each side at position A and B and then in line with the top of pocket one. If you didn't want it to tie on then you could sew the back panel to the front panel and B-J and A-I of the bottom section. This would mean just hemming or adding biased binding round G-H-I-J. I decided to tie mine as it will just on other chairs just not quite as well.  After checking the oven door worked and it fit well I had one last look over the top stitching and I was happy it was done.

It really is convenient and fun, she has had many hours playing with it and I am really pleased with how the fabrics worked together. It has a lot of scope for adaptation with different colours or pocket arrangements and could work on most chairs.